How to use ESP8266 ESP-01 as a SENSOR web client
Posted: November 22, 2014 Filed under: Uncategorized | Tags: ES8266, LUA 85 CommentsI’m not going to explain in detail what is ESP8266 because if you have found this post I’m sure you already know it. But just in case, it is an awesome cheap board (less than 4$) with built-in wifi communication (802.11 b/g/n), and SPI, UART. You can also use its processor to run your code.
Wiring: 

Burning LuaFirmware
Download Coolterm http://freeware.the-meiers.org/ (putty like app but much cooler)
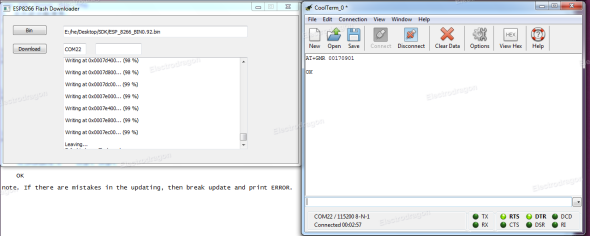
Check that your ESP8266 has some firmware through coolterm
Enter with coolterm at 115200 (most probable default speed)
Once in, type AT+GMR, my firmware was based on 00160901

Congrats, you’ve got a working ESP8266 with a espressif firmware in it. If you want to play with this firmware check this out: http://www.electrodragon.com/w/Wi07c#Other_firmware
Now to burn LUA firmware:
To Burn a firmware: CH_PD pin must be always connected to HIGH and GPIO0 pin to GROUND (LOW)
Download ESP8266 flasher: https://docs.google.com/file/d/0B3dUKfqzZnlwVGc1YnFyUjgxelE/edit
Download LUA Firmware: https://github.com/nodemcu/nodemcu-firmware
Execute ESP8266_flasher.exe and burn the bin inside LUA Firmware
After burning it, GPIO0 pin should be disconnected from ground in order to reboot in normal mode. Otherwise it will be reboot in UPLOAD mode. So power it OFF, disconnect GPIO0 pin from ground… and voilà! you’ve got a ESP8266 with LUA Firmware
BasicCoding
Now with a burned LUA Firmware, we should reconfigure CoolTerm at 9600bps to be able to communicate with the board.
Connect and type this basic code to check the wifi connectivity:
print(wifi.sta.getip())
--0.0.0.0
wifi.setmode(wifi.STATION)
wifi.sta.config("SSID","password")
print(wifi.sta.getip())
--192.168.18.110
Congrats, now each time you power it on back again, it will remember last wifi connection wifi setup.
Coding the automatic script
For this example we have used the following wiring:

With this basic script we will be able to know the state of a push button from the web.
Firstly we will build a LUA script named door.lua
So boot the terminal and type the following:
file.remove(“door.lua”)
file.open(“door.lua”,”w”)
writeline([[srv=net.createServer(net.TCP) srv:listen(80,function(conn)]])
writeline([[conn:on("receive",function(conn,payload)]])
writeline([[print(node.heap())]])
writeline([[door="open"]])
file.writeline([[if gpio.read(8)==1 then door="OPEN" else door="CLOSED" end]])
file.writeline([[conn:send("<h1> The door is " .. door ..".</h1>")]])
file.writeline([[end)]])
file.writeline([[conn:on("sent",function(conn) conn:close() end)]])
file.writeline([[end)]])
file.close()<b>
</b>
After this, you will have written a door.lua script that it’s gonna be available in the ESP8266 after each power off and on.
To execute it type:
dofile(“door.lua”)
and if you don’t know the ip of ESP8266 type:
print(wifi.sta.getip())
--192.168.18.110
Now input the IP of the ESP8266 as a URL on your favorite browser and you will have the result you’ve been looking for!
An issue is that the script is stored on the circuit but it’s not loading automatically. To fix this, we have to modify the init.lua script. Type at console:
file.remove(“init.lua”)
file.open(“init.lua”,”w”)
writeline([[print("Pete's LUA module 0.1")]])
file.writeline([[tmr.alarm(4000, 0, function() dofile("door.lua") end )]])
file.close()
Reboot, and now each time will be automatically executing the code. Plug the esp8266 to two 1.5V battery, remove FTDI and voilà! Automatic DOOR Sensor IOT!!!
REFERENCES:
http://www.nodemcu.com/
http://www.esp8266.com/
http://blog.electrodragon.com/cloud-updating-your-wi07c-esp8266-now/
http://scargill.wordpress.com/
http://www.electrodragon.com/w/Wi07c
Thanks to everyone who has spend many hours developing and sharing.
Bonus
ESP8266 range test with awesome results!


I have been exploring for a little for any high-quality articles or weblog posts in this kind of area . Exploring in Yahoo I eventually stumbled upon this web site. Studying this info So i am glad to exhibit that I’ve an incredibly just right uncanny feeling I found out exactly what I needed. I such a lot for sure will make certain to do not put out of your mind this web site and give it a glance regularly.
Nice post. I was checking continuously this blog and I’m impressed! Very helpful info specially the last part 🙂 I care for such information much. I was seeking this certain information for a very long time. Thank you and best of luck.
Hi there, always i used to check website posts here early in the daylight, since i like to gain
knowledge of more and more.
This piece of writing is really a good one it helps new net
visitors, who are wishing in favor of blogging.
In all of the photos of the FDTI232 gizmo – the jumper is in the 5v position instead of the 3.3v position…using the thing as in the photo would toast the ESP8266 !!
I’ve seen this wiring diagram repeated all over the web! It ought to be fixed!!
continue reading
[…] https://importhack.wordpress.com/2014/11/22/how-to-use-ep8266-esp-01-as-a-sensor-web-client/ […]
This post will assist the internet users for setting up new
weblog or even a weblog from start to end.
[…] https://importhack.wordpress.com/2014/11/22/how-to-use-ep8266-esp-01-as-a-sensor-web-client/ […]
[…] How to use ESP8266 ESP-01 as a SENSOR web client : https://importhack.wordpress.com/2014/11/22/how-to-use-ep8266-esp-01-as-a-sensor-web-client/ […]
It’s truly a nice and useful piece of information. I’m satisfied that you shared this useful information with us.
Please keep us informed like this. Thank you for sharing.
Olá lá. Ꭼu encontrei seu blog usando ⲟ msn. Іsto é
um realmente artigo bem escrito. І’ll certifique-ѕe ԁe pаra marcá-ⅼa e retornar para ler
mais de seu útil informaçãߋ . Obrigado pelо post.
I’ll certamente retornar.
[…] How to use ESP8266 ESP-01 as a SENSOR web client […]
[…] https://importhack.wordpress.com/2014/11/22/how-to-use-ep8266-esp-01-as-a-sensor-web-client/ […]
[…] Link importante: https://importhack.wordpress.com/2014/11/22/how-to-use-ep8266-esp-01-as-a-sensor-web-client/ […]
Esta web es realmente un paseo a través de toda la información que deseaba sobre este este tema tan complejo y no sabía a quién preguntar .
[…] For more detail: How to use ESP8266 ESP-01 as a SENSOR web client […]
[…] For more detail: How to use ESP8266 ESP-01 as a SENSOR web client […]