How to use ESP8266 ESP-01 as a SENSOR web client
Posted: November 22, 2014 Filed under: Uncategorized | Tags: ES8266, LUA 85 CommentsI’m not going to explain in detail what is ESP8266 because if you have found this post I’m sure you already know it. But just in case, it is an awesome cheap board (less than 4$) with built-in wifi communication (802.11 b/g/n), and SPI, UART. You can also use its processor to run your code.
Wiring: 

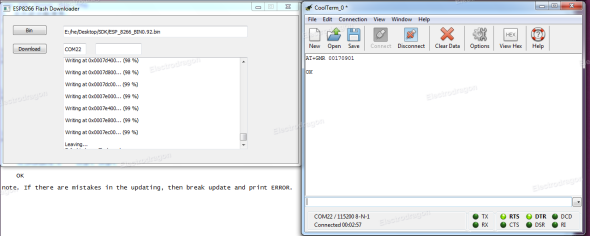
Burning LuaFirmware
Download Coolterm http://freeware.the-meiers.org/ (putty like app but much cooler)
Check that your ESP8266 has some firmware through coolterm
Enter with coolterm at 115200 (most probable default speed)
Once in, type AT+GMR, my firmware was based on 00160901

Congrats, you’ve got a working ESP8266 with a espressif firmware in it. If you want to play with this firmware check this out: http://www.electrodragon.com/w/Wi07c#Other_firmware
Now to burn LUA firmware:
To Burn a firmware: CH_PD pin must be always connected to HIGH and GPIO0 pin to GROUND (LOW)
Download ESP8266 flasher: https://docs.google.com/file/d/0B3dUKfqzZnlwVGc1YnFyUjgxelE/edit
Download LUA Firmware: https://github.com/nodemcu/nodemcu-firmware
Execute ESP8266_flasher.exe and burn the bin inside LUA Firmware
After burning it, GPIO0 pin should be disconnected from ground in order to reboot in normal mode. Otherwise it will be reboot in UPLOAD mode. So power it OFF, disconnect GPIO0 pin from ground… and voilà! you’ve got a ESP8266 with LUA Firmware
BasicCoding
Now with a burned LUA Firmware, we should reconfigure CoolTerm at 9600bps to be able to communicate with the board.
Connect and type this basic code to check the wifi connectivity:
print(wifi.sta.getip())
--0.0.0.0
wifi.setmode(wifi.STATION)
wifi.sta.config("SSID","password")
print(wifi.sta.getip())
--192.168.18.110
Congrats, now each time you power it on back again, it will remember last wifi connection wifi setup.
Coding the automatic script
For this example we have used the following wiring:

With this basic script we will be able to know the state of a push button from the web.
Firstly we will build a LUA script named door.lua
So boot the terminal and type the following:
file.remove(“door.lua”)
file.open(“door.lua”,”w”)
writeline([[srv=net.createServer(net.TCP) srv:listen(80,function(conn)]])
writeline([[conn:on("receive",function(conn,payload)]])
writeline([[print(node.heap())]])
writeline([[door="open"]])
file.writeline([[if gpio.read(8)==1 then door="OPEN" else door="CLOSED" end]])
file.writeline([[conn:send("<h1> The door is " .. door ..".</h1>")]])
file.writeline([[end)]])
file.writeline([[conn:on("sent",function(conn) conn:close() end)]])
file.writeline([[end)]])
file.close()<b>
</b>
After this, you will have written a door.lua script that it’s gonna be available in the ESP8266 after each power off and on.
To execute it type:
dofile(“door.lua”)
and if you don’t know the ip of ESP8266 type:
print(wifi.sta.getip())
--192.168.18.110
Now input the IP of the ESP8266 as a URL on your favorite browser and you will have the result you’ve been looking for!
An issue is that the script is stored on the circuit but it’s not loading automatically. To fix this, we have to modify the init.lua script. Type at console:
file.remove(“init.lua”)
file.open(“init.lua”,”w”)
writeline([[print("Pete's LUA module 0.1")]])
file.writeline([[tmr.alarm(4000, 0, function() dofile("door.lua") end )]])
file.close()
Reboot, and now each time will be automatically executing the code. Plug the esp8266 to two 1.5V battery, remove FTDI and voilà! Automatic DOOR Sensor IOT!!!
REFERENCES:
http://www.nodemcu.com/
http://www.esp8266.com/
http://blog.electrodragon.com/cloud-updating-your-wi07c-esp8266-now/
http://scargill.wordpress.com/
http://www.electrodragon.com/w/Wi07c
Thanks to everyone who has spend many hours developing and sharing.
Bonus
ESP8266 range test with awesome results!


[…] firmware, opening the doors to an Internet of Things based around an ESP8266. [Marc] and [Xavi] just wrote up a quick tutorial on how to turn the ESP8266 into a WiFi sensor platform that will relay the state of a GPIO pin to […]
[…] firmware, opening the doors to an Internet of Things based around an ESP8266. [Marc] and [Xavi] just wrote up a quick tutorial on how to turn the ESP8266 into a WiFi sensor platform that will relay the state of a GPIO pin to […]
Attempting to write your firmware, everything starts OK, but then I always end up with:
Writing at 0x00007000… (5 %)
Invalid head of packet
Any ideas?
So, after trying different ESP8266 boards, power supplies, etc. I tried using a different USB port on the computer and the problem solved itself. Go figure.
Now… “The door is open” “The door is closed” Brilliant!
Thanks guys! This is great stuff!
Molt be!
I have the same problem: “Invalid head of packet”.
Have tried every USB port with no chance.
What should I do?
I had this issue, and worked around it by choosing a different firmware binary file. For my ESP-01 module, I was able to load version 0.9.5 (20150106.bin), and it seems to work, but requires lua source code (no more AT commands).
[…] firmware, opening the doors to an Internet of Things based around an ESP8266. [Marc] and [Xavi] just wrote up a quick tutorial on how to turn the ESP8266 into a WiFi sensor platform that will relay the state of a GPIO pin to […]
Anybody have luck modifying the network firmware into a mesh setup? Once this chip runs LUA scripts on a mesh topology the IOT will bloody explode!
p.s – There needs to be some encryption, and a heartbeat to be secure or else someone could DDOS the router and gain entrance to the building is this was the only security sensor on that door.
[…] by Mark and Xavi’s How to use ESP8266 ESP-01 as a SENSOR web client post, I decided to use Lua for this quick […]
Thanks guys! You saved me a lot of time with this afternoon’s project:
Using the ESP8266 as a Power Monitor.
Not knowing the chip or Lua, I couldn’t have done it without this post. You showed me what I needed to know to get going.
Hi, are those " meant to be there or are they supposed to be “”?
Correction:
Are those & quot ; meant to be there or are they supposed to be “”?
You need to un-html them to single quotes like ‘ (although that would screw up the Pete’s line) so maybe ” is needed sometimes.
I hope the code on my posting (above) is more readable, but browsers and WordPress can play havoc with this stuff.
[…] večer jsem objevil přímo neuvěřitelnou věc – existuje alternativní FW, který obsahuje interpreter jazyka LUA (učebnici LUA mám ve svém Kindlu tuším od začátku roku…). Pro účely přehrávání […]
Is it possible for you to create a simple temperature reporter using a TMP36 sensor.
Using a identity for the individual board to be able to use several at the same time but identify the reported temperatures.
Having it to report the temperature every 10 minutes.
Configuring the WLAN ssid in a changable way ( maybe over the serial)
That was my plan next summer. Create a bunch of solar charged temp, humidity, water meters for my greenhouse. Make each sensor create a random SSID and an app to connect to each for naming, pairing. I was originally using the Synaptics python mondules but they where bloody expensive at $50 a pop.
@OP Would you consider running a smaller scale test and measure power consumption over a 10m/100m/250m distances? I ordered my boards but with Christmas coming and new Hong Kong export regs im afraid I will be waiting a long while…
The code shows “writeline” without the file.writeline, and there is a at the end.
Here’s a corrected version of it (hopefully):
file.remove(‘door.lua’)
file.open(‘door.lua’,’w’)
file.writeline([[srv=net.createServer(net.TCP) srv:listen(80,function(conn)]])
file.writeline([[conn:on(‘receive’,function(conn,payload)]])
file.writeline([[print(node.heap())]])
file.writeline([[door=’open’]])
file.writeline([[if gpio.read(8)==1 then door=’OPEN’ else door=’CLOSED’ end]])
file.writeline([[conn:send(‘ The door is ‘ .. door ..’.’)]])
file.writeline([[end)]])
file.writeline([[conn:on(‘sent’,function(conn) conn:close() end)]])
file.writeline([[end)]])
file.close()
Sorry, I posted some mistakes. This code works:
file.remove(‘door.lua’)
file.open(‘door.lua’,’w’)
file.writeline([[srv=net.createServer(net.TCP) srv:listen(80,function(conn)]])
file.writeline([[conn:on(“receive”,function(conn,payload)]])
file.writeline([[print(node.heap())]])
file.writeline([[door=’open’]])
file.writeline([[if gpio.read(8)==1 then door =”OPEN” else door=”CLOSED” end]])
file.writeline([[conn:send(” The door is ” .. door ..”.”)]])
file.writeline([[end)]])
file.writeline([[conn:on(“sent”,function(conn) conn:close() end)]])
file.writeline([[end)]])
file.close()
Then:
dofile(‘door.lua’)
Also note too, that if you leave GPIO connected to the switch setup in the example, it will boot into flash mode next time power is cycled. I pulled my hair out thinking it was a power supply issue!
[…] firmware, opening the doors to an Internet of Things based around an ESP8266. [Marc] and [Xavi] just wrote up a quick tutorial on how to turn the ESP8266 into a WiFi sensor platform that will relay the state of a GPIO pin to […]
when ever i issue a node.restart() device crashing and device is not responding after restarting the esp8266 . i picked firmware from https://github.com/nodemcu/nodemcu-firmware and loaded nodemcu_512k.bin at 0x00000 . Can anyone help me out
when ever i issue a node.restart() device crashing and device is not responding after restarting the esp8266 . i picked firmware from https://github.com/nodemcu/nodemcu-firmware and loaded nodemcu_512k.bin at 0x00000 . Can anyone help me out
Module which is used is ESP-01
Reblogged this on kireevco.
[…] 1) Wykorzystanie modułu ESP8266 jako zdalnego czujnika temperatury (i np.: podłączenie do Raspberry Pi z nettemp) – podobnie jak Techfreak niedawno nabyłem moduł ESP8266, który nie dość, że jest interfejsem WIFI-RS232, to do tego posiada procesor i pamięć EEPROM, które można programować. Wystarczy zasilacz, w/w moduł i czujnik 18b20, żeby stworzyć w pełni autonomiczną czujkę temperatury. Idealne i bardzo tanie rozwiązanie. Mam nadzieję wkrótce pochwalić się wynikami zabawy. Modułowo przysłało rozszerzenie do nettemp dla Raspberry Pi (w wersji bez +), Raspberry Pi czeka w gotowości (drugie pracuje jako XBMC podłączone do telewizora) – jest co robić. Na temat wykorzystania ESP8266 więcej znajdziecie na blogu import <hack>. […]
Great work, thanks for giving me a start on the ESP8266. LUA is just what I need.
I added gpio.mode(doorpin, gpio.INPUT, gpio.PULLUP) to the initialization steps in order to use the internal pull-up resistor. Because I now have two references to the pin I added variable “doorpin”.
The door is open by default and when grounded the door is closed.
file.remove("door.lua")

file.open("door.lua","w")

file.writeline([[doorpin=4]])

file.writeline([[gpio.mode(doorpin, gpio.INPUT, gpio.PULLUP)]])

file.writeline([[srv=net.createServer(net.TCP) srv:listen(80,function(conn)]])

file.writeline([[conn:on("receive",function(conn,payload)]])

file.writeline([[print(node.heap())]])

file.writeline([[door="open"]])

file.writeline([[if gpio.read(doorpin)==1 then door="OPEN" else door="CLOSED" end]])

file.writeline([[conn:send(" The door is " .. door ..".")]])

file.writeline([[end)]])

file.writeline([[conn:on("sent",function(conn) conn:close() end)]])

file.writeline([[end)]])

file.close()
N.B. The pin GPIO mappings have changed in 20141219 and later firmware. In my example 4 is for GPIO2.
amigo me prodrias pasar el codigo completo es que lo corro pero me marca error
friend you can spend the whole code is that I run but sent me error
[…] How to use ESP8266 ESP-01 as a SENSOR web client […]
Reblogged this on Imran's Tech Tips and commented:
I am liking ESP8266 more as I continue to experiment with it for my #Automation project.
[…] out this guys blog for how to flash the […]
I am looking for a way to enter a string (from an onscreen key board) into Lua and have that string appear at ther serial port on the esp8266.
Has anyone done this ?
Take two:
I am looking for a way to enter a string at the browser and have that string go to the serial port on the esp8266.
OK, that looks better. 🙂
Has anyone done this ?
SIr, i have my esp8266 working already after I load some code, then if I unplug the supply it it will not work anymore. Is there a possible ways of making it a stand alone esp without any reuploading of code.
Thanks so much for a nudge in the right direction, guys!
How can I auto-refresh the browser page, so that the status of the io pin may be displayed without having to manually refresh the page?
I need this information too. Who Know how to do auto-refresh page? And one more question. Does any bodie do page (web-server) of input SSID and PASS forms, and then after send its, reconnect to wi-fi local?
Thanks for the tutorial. This gave me the start got getting my ESP-12 to work with LUA.
NB: during programming of the ESP-12 GPIO00 and GPIO15 must be connected to GND and GPIO02 to Vcc
[…] https://importhack.wordpress.com/2014/11/22/how-to-use-ep8266-esp-01-as-a-sensor-web-client/ […]
[…] Cr. https://importhack.wordpress.com/2014/11/22/how-to-use-ep8266-esp-01-as-a-sensor-web-client/ […]
Hi, I was uploading the firmware ESP_8266_BIN0.92.bin and restarted after it… but
1. the ESP is communicating still in 115200 baud not at 9600 as you mention in the tutorial… and if I copy/paste any LUA command, it says Error
I am using CoolTerm on a Mac…
Thanks in advance….
I mean what can be the problem? In the NodeMCU zipfile, there are several firmwares, but none of them named like in your screenshot.
Can you please link the firmware you are using?
[…] How to use ESP8266 ESP-01 as a SENSOR web client. […]
marc,
Thanks for the tutorial. Got my 8266-01 flashed to 0.9.5 20150106.bin, which seems to require lua code/commands to work properly. I can write the contents of a lua code file to the 8266 using coolterm (connection/send textfile…), and the program works (mostly). My problem is that a power cycle clears the program from memory. Your post implies that writing lua commands to the 8266 should remain after a power cycle: (“Congrats, now each time you power it on back again, it will remember last wifi connection wifi setup.”)
This has not been my experience, however. I’m looking for a way to write my lua program to flash memory, but LuaLoader is not working for me. Any thoughts?
Also, is the GPIO0 pin grounding exclusively for flashing expressif firmware, or for any code going to non-volatile memory?
[…] Using FTDI […]
Hello
Above code dont work i think there is no ” mark in it but i dont know what to fix and how.
Can you post normal LUA file
i am trying to establish client server communication in full duplex mode but it does not seems to work . i tried in simplex mode and it works properly. i am using lua in nodemcu firmware.
please help me out
" … mwhuaahahaahahahahaaaaa…
YMMD
Just getting started with nodemcu and trying to learn the statement syntax etc. I came here for examples, and tried to do the basic communication…
print(wifi.sta.getip())
–0.0.0.0
wifi.setmode(wifi.STATION)
wifi.sta.config("SSID","password")
print(wifi.sta.getip())
–192.168.18.110
when I typed in the first line the reply was:
stdin:1: attempt to index global ‘wifi’ (a nil value)
stack traceback:
stdin:1: in main chunk
[C]:?
Any Clues?
@john, Greetings from another John starting out. I’m using Esplorer as a serial communications terminal and that code works for me. I do know from trial and error that some terminal programs don’t work as well as others. Esplorer has some great features if you haven’t tried it you might want to check it out. It is more of an IDE than just a terminal.You can copy/paste code into it, type in like command line, or there are multiple “buttons” that simply send some quick commands like restart, chip id heap and more.
Hello, I am using an ESP 7 module, with the latest download of nodemcu (as of 10/05/15). I’d hoped to use this as an exercise to learn how to connect to wifi with the module. I am using Esplorer to interface with the module. I’ve done some uploads to the module, to test gpio pins successfully, but this code generates errors on every line when I try to upload it. Could it be the versions of nodemcu have changed syntax? I’m new at this so I’m not sure what is going on…..Thanks for any help…..
> file.remove(“Sensor_porta.lua”);
> file.open(“Sensor_porta.lua”,”w+”);
> w = file.writeline
> w([[file.remove(“door.lua”)]]);
> w([[file.open(“door.lua”,”w”)]]);
> w([[writeline([[srv=net.createServer(net.TCP) srv:listen(80,function(conn)]])]]);
stdin:1: nesting of [[…]] is deprecated near ‘[‘w([[writeline([[conn:on("receive",function(conn,payload)]])]]);
stdin:1: nesting of [[…]] is deprecated near ‘[‘w([[writeline([[print(node.heap())]])]]);
stdin:1: nesting of [[…]] is deprecated near ‘[‘w([[writeline([[door="open"]])]]);
stdin:1: nesting of [[…]] is deprecated near ‘[‘w([[file.writeline([[if gpio.read(8)==1 then door="OPEN" else door="CLOSED" end]])]]);
stdin:1: nesting of [[…]] is deprecated near ‘[‘w([[file.writeline([[conn:send("<h1> The door is " .. door ..".</h1>")]])]]);
stdin:1: nesting of [[…]] is deprecated near ‘[‘w([[file.writeline([[end)]])]]);
stdin:1: nesting of [[…]] is deprecated near ‘[‘w([[file.writeline([[conn:on("sent",function(conn) conn:close() end)]])]]);
stdin:1: nesting of [[…]] is deprecated near ‘[‘w([[file.writeline([[end)]])]]);
stdin:1: nesting of [[…]] is deprecated near ‘[‘w([[file.close()<b>]]);
> w([[</b>]]);
> file.close();
> dofile(“Sensor_porta.lua”);
Sensor_porta.lua:1: unexpected symbol near ‘“’
>
Could be help me?
WARNING
Do not waste your time on it, it’s a nonsense that does not work
[…] How to use ESP8266 ESP-01 as a SENSOR web client : https://importhack.wordpress.com/2014/11/22/how-to-use-ep8266-esp-01-as-a-sensor-web-client/ […]
All you should do is to use the best chiropractic service. Patently wait for the result of chiropractic treatment for you will ahieve drug free,
and restorative of your spine. That is the reason it is important to know the symptoms of TMJ and differentiate it with simple head aches in order to avoid
further harm.
Good information. Lucky me I ran across your website by accident (stumbleupon).
I have saved as a favorite for later!
One particular steam opening in between, don’t assume all the way over
like Colossal or Dinar or HAAN. This running water will in fact speed
up your removal of the water and with a simple flip of the
valve can add water to the fish tank. Linoleum has had its day, but today’s buyers are not interested in it, particularly if it is old, faded, yellowed or curling.
What you wrote was very logical. However, think about this, what if you wrote a catchier
post title? I ain’t saying your content is not good, however suppose you added a
headline that makes people desire more? I mean How
to use ESP8266 ESP-01 as a SENSOR web client | import <hack> is kinda
plain. You ought to glance at Yahoo’s home page
and note how they write news headlines to get viewers to click.
You might try adding a video or a related pic or two to get readers interested about everything’ve written. Just
my opinion, it might bring your website a little livelier.
I have ESP-01 and CH340 ttl adapter. Can’t make it work. If I connect CH_PD cable to the ESP the adapter just disappears from devices. Tried in Linux and Windows – same result. Windows says that “the connected device is not recognized”. I used that adapter before for communication with a router and it worked just great. Any ideas what can be wrong?
-Stan
Not much to go on there.
Which adapter are you using ?
A schematic and pic of the board (both sides) would be helpful.
Thanks for help! I use this adapter http://goo.gl/uv2fJi but I figured out what’s wrong already!
The trouble was – the ESP-01 requires exactly 3.3v to work. I experimented with a few sources which had 3.25 volts and probably were not powerful enough. Once I used ATX power supply it started responding normally. Not sure why it caused the adapter to stop working though.
[…] I must give credit to the useful cover photo, which I took from How to use ESP8266 ESP-01 as a SENSOR web client. […]
Having read this I thought it was rather informative.
I appreciate you spending some time and effort to put
this short article together. I once again find myself spending a significant
amount of time both reading and leaving comments.
But so what, it was still worthwhile!
could we use the ESP8266 to control the digital leds;
pls see the led datasheet in the below link:
Click to access SK6812%20RGBW%20LED.pdf
I get pleasure from, result in I found exactly what I used to
be taking a look for. You have ended my
four day long hunt! God Bless you man. Have a great day. Bye